Unbounce is a great marketing platform but when it comes to some important features like a Countdown timer for a limited time offer or coupon, it’s a feature that Unbounce do not provide. But still you can implement a coundown timer without coding knowledge through this post and the code below.
I mentioned in my previous post about missing features of Unbounce and shared coding tips to implement an Image slider in Unbounce.
I have come up with another solution to implement a countdown timer in Unbounce You can see the Countdown timer demo here -> Countdown Timer in Unbounce
Countdown Timer in Unbounce
1. Create a new page in Unbounce
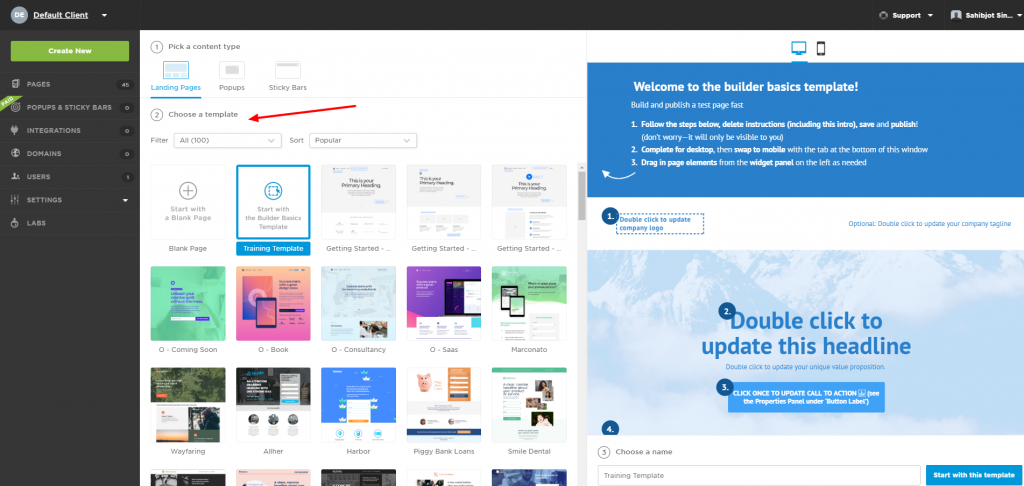
2. Choose a template or just select a blank template. For now select blank template.
3. In builder. pick “Custom HTML” element and drop it in the page. Then copy and paste the following code.
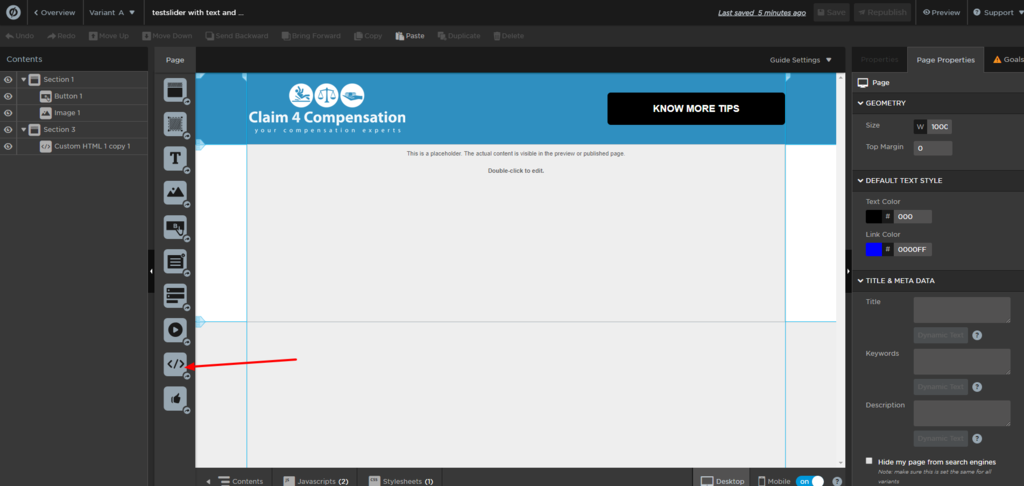
You don’t have to change anything in the following HTML code.
<div>
<h1 id="head"></h1>
<ul>
<li><span id="days"></span>days</li>
<li><span id="hours"></span>Hours</li>
<li><span id="minutes"></span>Minutes</li>
<li><span id="seconds"></span>Seconds</li>
</ul>
</div>
4. Copy the following JS code and add in a new JS script named “slider”.

You need to update the date in the JS to the date you want for the countdown timer. Remember You can set it for a specific date.
Make sure the placement of the code is changed to ” Before body end tag”.
<script>
const second = 1000,
minute = second * 60,
hour = minute * 60,
day = hour * 24;
let countDown = new Date('OCT 13, 2019 23:59:00').getTime(),  /*Update Date and time in the brackets*/
x = setInterval(function() {
let now = new Date().getTime(),
distance = countDown - now;
document.getElementById('days').innerText = Math.floor(distance / (day)),
document.getElementById('hours').innerText = Math.floor((distance % (day)) / (hour)),
document.getElementById('minutes').innerText = Math.floor((distance % (hour)) / (minute)),
document.getElementById('seconds').innerText = Math.floor((distance % (minute)) / second);
//do something later when date is reached
//if (distance < 0) {
// clearInterval(x);
// 'IT'S MY BIRTHDAY!;
//}
}, second)</script>
4. Add following CSS in the page. You can update any properties based on your preferences. But don’t update the class names. If you update, make sure to update it in HTML as well.
<style>
* {
box-sizing: border-box;
margin: 0;
padding: 0;
}
.container {
color: #fff;
text-align: center;
}
h1 {
font-weight: normal;
}
/*li {
padding-top:50px;
width:200px;
height:200px;
border: 2px solid #fff;
border-radius:50%;
display: inline-block;
font-size: 1.5em;
list-style-type: none;
text-transform: uppercase;
line-height: 1.2;
}
*/
li {
padding-top: 30px;
width: 150px;
height: 150px;
border: 4px solid #000;
/* border-radius: 50%; */
display: inline-block;
font-size: 1.5em;
list-style-type: none;
text-transform: uppercase;
line-height: 1.2;
color: #c4161c;
background-color: #fff;
}
li span {
display: block;
font-size: 48px;
}
@media only screen and (max-width:640px)
{
li span {
display: block;
font-size: 24px;
}
li {
padding:30px;
width:130px;
height:130px;
line-height: 1.2;
}
}
</style>
That’s it. You should be able to see your countdown timer working on your landing pages now.
It’s responsive and works great on mobile devices as well.
Found this post helpful? Let us know your suggestions and queries in the comment box below. We’ll try to help as soon as possible.
More tips and updates related to unbounce here.


