Please like and subscribe to the Youtube channel for more videos ->
Unbounce is certainly a great tool to design beautiful landing pages. It has various inbuilt features that you would need in a landing page but there are many features that you may want in your landing page and can’t get it due to limitations of Unbounce.
There are many features like Image Slider, Countdown timer, and much more that you may want but don’t get it in your subscription. No worries! You can see set up an image slider with text and button in your unbounce pages.
You can see the image slider demo here -> Unbounce Image Slider With Text and Button
NOTE: You can use below HTML, CSS and JS to use the slider in your custom coded websites as well.Just made it easier for you to get the slider in your account. Download the file and go through the article to update your images and text.
Image Slider Settings
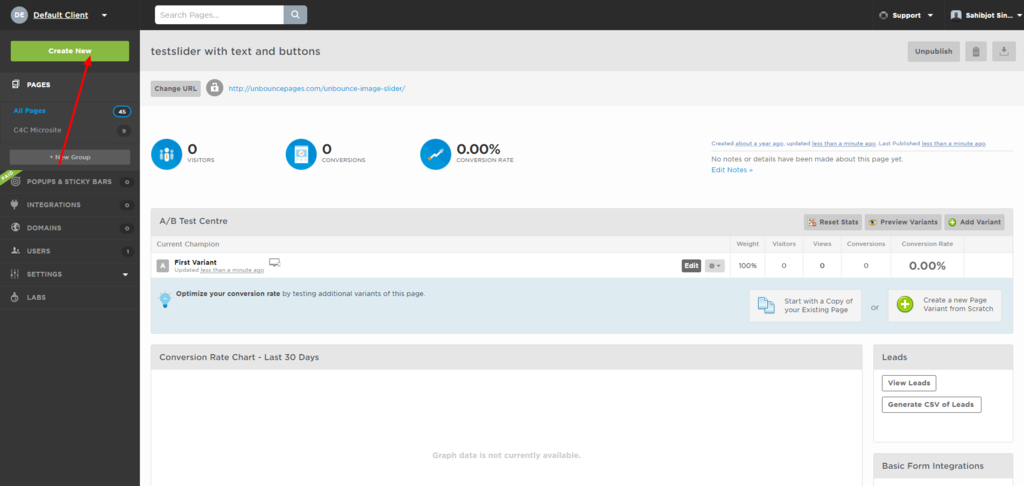
1. Create a new page in Unbounce
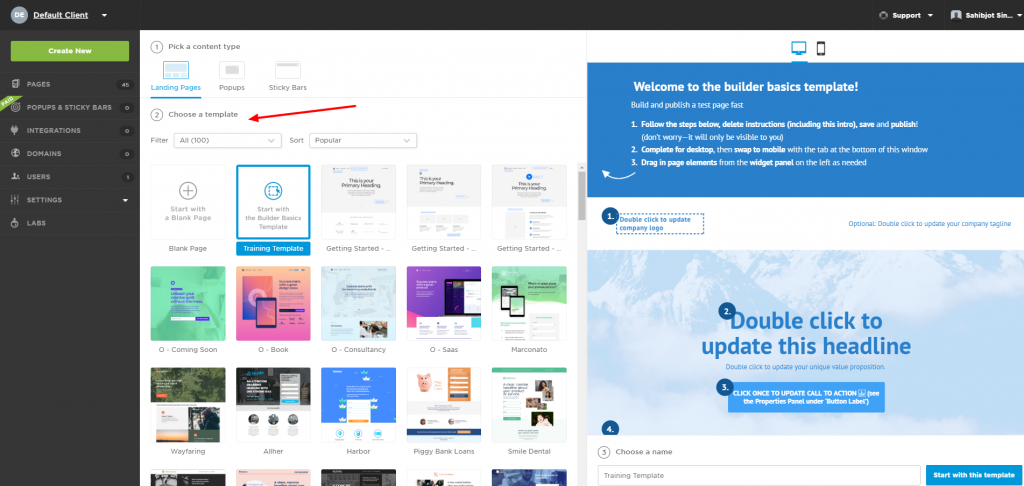
2. Choose a template or just select a blank template. For now select blank template.
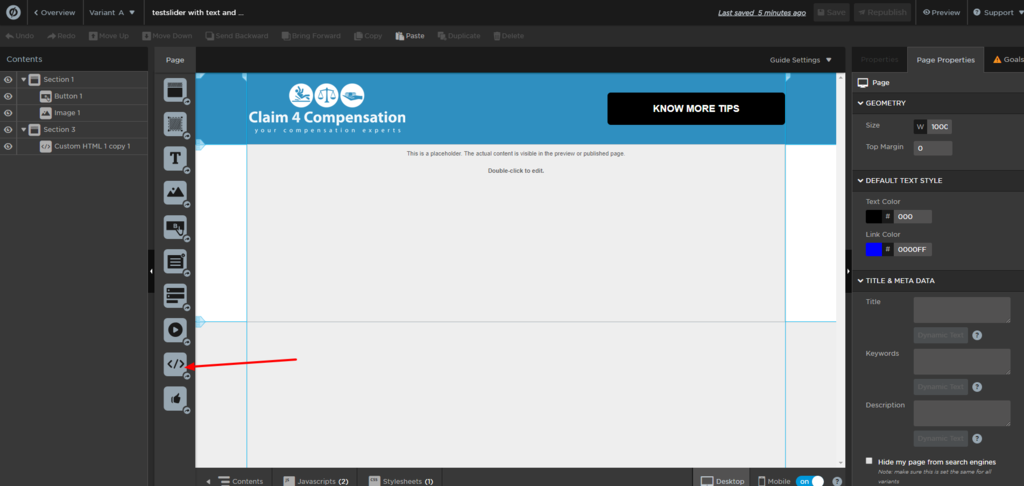
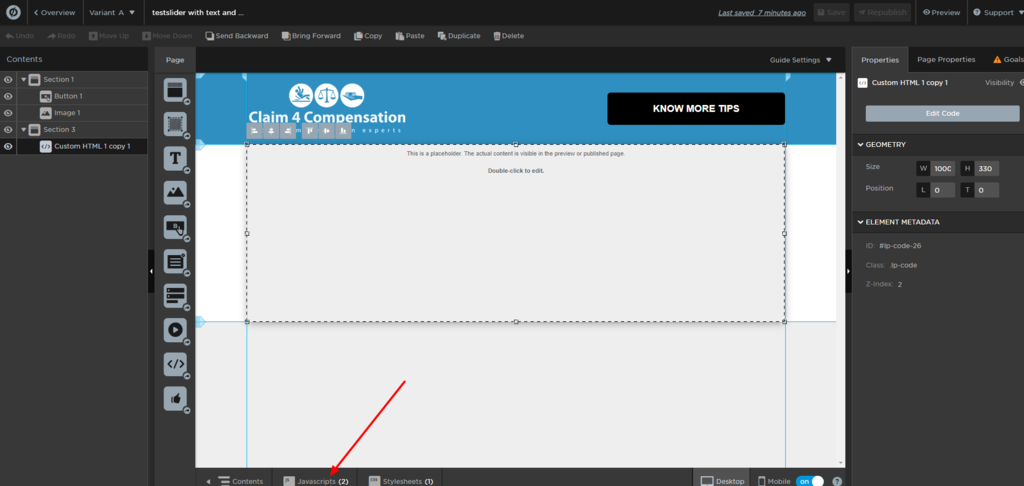
3. In builder. pick “Custom HTML” element and drop it in the page. Then copy and paste the following code.
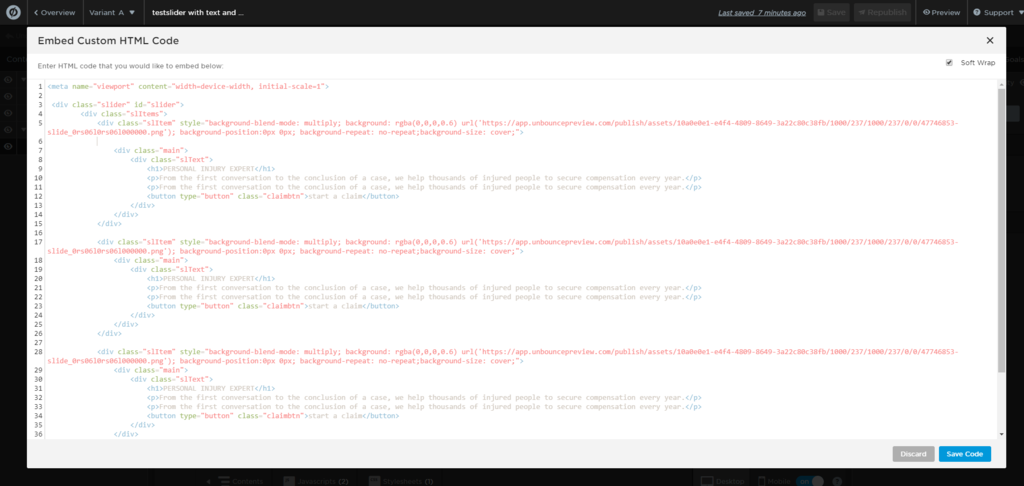
Change “background-image” URL with your image URL in the code. H1 is the title in the slider.
<p> Tag contains description text.
You can copy all the HTML code from here.
<meta name="viewport" content="width=device-width, initial-scale=1">

 <div class="slider" id="slider">
		<div class="slItems">
			<div class="slItem" style="background-blend-mode: multiply; background: rgba(0,0,0,0.6) url('https://app.unbouncepreview.com/publish/assets/10a0e0e1-e4f4-4809-8649-3a22c80c38fb/1000/237/1000/237/0/0/47746853-slide_0rs06l0rs06l000000.png'); background-position:0px 0px; background-repeat: no-repeat;background-size: cover;">

              	<div class="main">
              		<div class="slText">
						<h1>Slider Headline 1</h1>
						<p>Slider text for first slider.</p>
						<p>Lorem ipsum dolor sit amet, consectetur adipiscing elit, sed do eiusmod tempor incididunt ut labore et dolore magna aliqua</p>
                      <p><a target="_blank" href="https://www.youtube.com/channel/UCMwWUPxRa4BjHvI9K-6H3-Q" class="claimbtn">Click to youtube</a></p>
					</div>
                </div>
			</div>

			<div class="slItem" style="background-blend-mode: multiply; background: rgba(0,0,0,0.6) url('https://app.unbouncepreview.com/publish/assets/10a0e0e1-e4f4-4809-8649-3a22c80c38fb/1000/237/1000/237/0/0/47746853-slide_0rs06l0rs06l000000.png'); background-position:0px 0px; background-repeat: no-repeat;background-size: cover;">
				<div class="main">
              		<div class="slText">
						<h1>Slider 2 headline</h1>
						<p>Lorem ipsum dolor sit amet, consectetur adipiscing elit, sed do eiusmod tempor incididunt ut labore et dolore magna aliqua</p>
						<p><a target="_blank" href="https://yahoo.com.com" class="claimbtn">Click to yahoo</a></p>
					</div>
                </div>
			</div>

			<div class="slItem" style="background-blend-mode: multiply; background: rgba(0,0,0,0.6) url('https://app.unbouncepreview.com/publish/assets/10a0e0e1-e4f4-4809-8649-3a22c80c38fb/1000/237/1000/237/0/0/47746853-slide_0rs06l0rs06l000000.png'); background-position:0px 0px; background-repeat: no-repeat;background-size: cover;">
				<div class="main">
              		<div class="slText">
						<h1>Your Headline 3</h1>
						<p>Lorem ipsum dolor sit amet, consectetur adipiscing elit, sed do eiusmod tempor incididunt ut labore et dolore magna aliqua</p>
						<p>From the first conversation to the conclusion of a case, we help thousands of injured people to secure compensation every year.</p>
						<p><a target="_blank" href="https://google.com" class="claimbtn">Click to google</a></p>
					</div>
                </div>
			</div>

		</div>
	</div>
4. Add custom JS in your page. Copy the following JS code and add in a new JS script named “mainjs”.
<script src="https://ajax.googleapis.com/ajax/libs/jquery/2.2.4/jquery.min.js"></script>
	<script>
	$(function(){
		$('#slider').rbtSlider({
			height: '450px',
			'dots': true,
			'arrows': true,
			'auto': 3
		});
	});
</script>
Add this JS code in your Javascript section. You don’t need to update the code. Change the code placement to “Head” section.
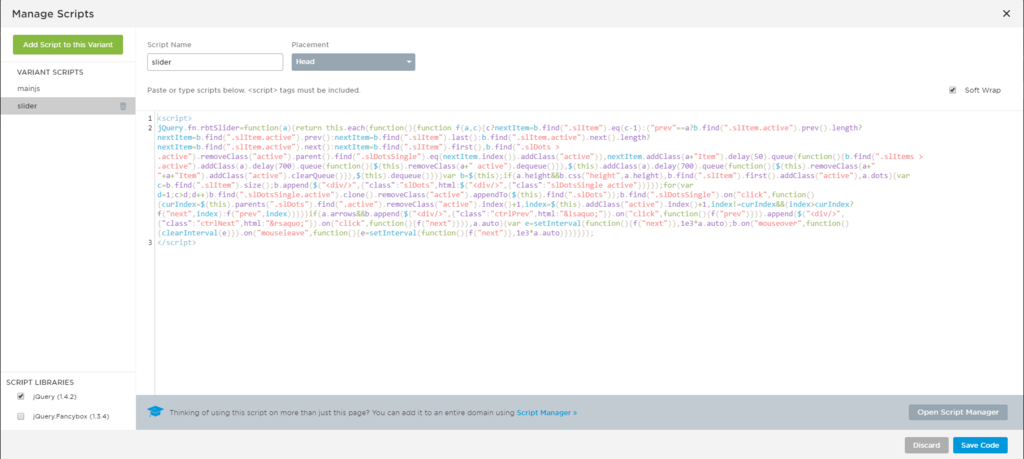
5. Create a new javascript variant by clicking on the green button on the top left. Name it as “slider-image“.
Add the following JS code in it.
<script>
jQuery.fn.rbtSlider=function(a){return this.each(function(){function f(a,c){c?nextItem=b.find(".slItem").eq(c-1):("prev"==a?b.find(".slItem.active").prev().length?nextItem=b.find(".slItem.active").prev():nextItem=b.find(".slItem").last():b.find(".slItem.active").next().length?nextItem=b.find(".slItem.active").next():nextItem=b.find(".slItem").first(),b.find(".slDots > .active").removeClass("active").parent().find(".slDotsSingle").eq(nextItem.index()).addClass("active")),nextItem.addClass(a+"Item").delay(50).queue(function(){b.find(".slItems > .active").addClass(a).delay(700).queue(function(){$(this).removeClass(a+" active").dequeue()}),$(this).addClass(a).delay(700).queue(function(){$(this).removeClass(a+" "+a+"Item").addClass("active").clearQueue()}),$(this).dequeue()})}var b=$(this);if(a.height&&b.css("height",a.height),b.find(".slItem").first().addClass("active"),a.dots){var c=b.find(".slItem").size();b.append($("<div/>",{"class":"slDots",html:$("<div/>",{"class":"slDotsSingle active"})}));for(var d=1;c>d;d++)b.find(".slDotsSingle.active").clone().removeClass("active").appendTo($(this).find(".slDots"));b.find(".slDotsSingle").on("click",function(){curIndex=$(this).parents(".slDots").find(".active").removeClass("active").index()+1,index=$(this).addClass("active").index()+1,index!=curIndex&&(index>curIndex?f("next",index):f("prev",index))})}if(a.arrows&&b.append($("<div/>",{"class":"ctrlPrev",html:"‹"}).on("click",function(){f("prev")})).append($("<div/>",{"class":"ctrlNext",html:"›"}).on("click",function(){f("next")})),a.auto){var e=setInterval(function(){f("next")},1e3*a.auto);b.on("mouseover",function(){clearInterval(e)}).on("mouseleave",function(){e=setInterval(function(){f("next")},1e3*a.auto)})}})};
</script>
Add the above JS code in your Javascript section. You don’t need to update the code. Change the code placement to “Head” section.
4. Add following CSS in the page. You can update any properties based on your preferences. But don’t update the class names. If you update, make sure to update it in HTML as well.
<style>
/* Change the ID in the first block with your HTML element ID from unbounce to make your slider full width
#lp-code-235 { display: block; left: 0px; top: 188px; z-index: 1; width: 1000px; height: 450px; width: 100vw; position: relative; margin-left: -50vw; left: 49.1%; } .slider { width: 100%; height: 100vh; position: relative; } .slItems { width: 100%; height: 100%; overflow: hidden; position: relative; } .slItem { width: 100%; height: 100%; position: absolute; top: 0; left: 0; background-size: cover; background-repeat: no-repeat; opacity: 0; visibility: hidden; -webkit-backface-visibility: hidden; /* Chrome, Safari, Opera */ backface-visibility: hidden; } .slText { position: absolute; top:48%; left: 50%; max-width: 100%; width: 62%; padding: 0 170px; text-align: left; transform: translate3d(-48%, -51%, 0); -webkit-transform: translate3d(-48%, -51%, 0); -moz-transform: translate3d(-48%, -51%, 0); -o-transform: translate3d(-48%, -51%, 0); -ms-transform: translate3d(-48%, -51%, 0); } .slText h1 { color: #fff; font-size: 39px; max-width: 540px; padding-bottom: 20px; font-weight: normal; border-bottom: #fff solid thin; } .slText p{ font-size: 16px; max-width:540px; color: #fff; line-height:26px; margin:15px 0px 0px 0px; } .claimbtn{ margin:25px 0 0 0; padding:15px 100px; background:#2f8fc0; border:#2f8fc0 solid 2px; border-bottom:#1f6f98 solid 5px; outline:none; color:#fff; text-transform: uppercase; font-size:18px; font-weight: bold; border-radius: 5px; } .slider [class*="ctrl"] { position: absolute; top: 50%; color: #fff; font-size: 85px; font-weight: bold; margin-top: -42.5px; cursor: pointer; } .ctrlNext { right: 50px; } .ctrlPrev { left: 50px; } .slItem.active { opacity: 1; visibility: visible; transform: translate3d(0,0,0); -webkit-transform: translate3d(0,0,0); -moz-transform: translate3d(0,0,0); -o-transform: translate3d(0,0,0); -ms-transform: translate3d(0,0,0); } .next, .prev { transition: transform 0.7s ease-in-out; -webkit-transition: -webkit-transform 0.7s ease-in-out; -moz-transition: -moz-transform 0.7s ease-in-out; -o-transition: -o-transform 0.7s ease-in-out; -ms-transition: -ms-transform 0.7s ease-in-out; } .slItem.nextItem { opacity: 1; visibility: visible; transform: translate3d(100%,0, 0); -webkit-transform: translate3d(100%,0,0); -moz-transform: translate3d(100%,0,0); -o-transform: translate3d(100%,0,0); -ms-transform: translate3d(100%,0,0); } .slItem.nextItem.next, .slItem.prevItem.prev { transform: translate3d(0,0); -webkit-transform: translate3d(0,0,0); -moz-transform: translate3d(0,0,0); -o-transform: translate3d(0,0,0); -ms-transform: translate3d(0,0,0); } .slItem.active.next { transform: translate3d(-100%,0,0); -webkit-transform: translate3d(-100%,0,0); -moz-transform: translate3d(-100%,0,0); -o-transform: translate3d(-100%,0,0); -ms-transform: translate3d(-100%,0,0); } .slItem.prevItem { opacity: 1; visibility: visible; transform: translate3d(-100%,0,0); -webkit-transform: translate3d(-100%,0,0); -moz-transform: translate3d(-100%,0,0); -o-transform: translate3d(-100%,0,0); -ms-transform: translate3d(-100%,0,0); } .slItem.active.prev { transform: translate3d(100%,0,0); -webkit-transform: translate3d(100%,0,0); -moz-transform: translate3d(100%,0,0); -o-transform: translate3d(100%,0,0); -ms-transform: translate3d(100%,0,0); } .slDots { position: absolute; bottom: 50px; left: 50%; transform: translate(-50%, 0); -webkit-transform: translate(-50%, 0); -moz-transform: translate(-50%, 0); -o-transform: translate(-50%, 0); -ms-transform: translate(-50%, 0); } .slDotsSingle { width: 13px; height: 13px; float: left; border: 2px solid #FFFFFF; border-radius: 50%; margin-left: 5px; cursor: pointer; transition: background 0.3s ease; } .slDotsSingle.active { background: #FFFFFF; } .slDotsSingle:hover { background: #D0D0D0; border-color: #D0D0D0; } @media(max-width: 768px){ .slText h1{max-width: 100%; font-size: 28px;line-height: 38px;} .slText p{max-width: 100%; padding: 0px 30px;} .slText{padding: 0 20px; text-align: center; width: 100%;} .claimbtn{padding:15px 90px;} .slDots{bottom: 16px;} .ctrlNext, .ctrlPrev{display: none;} #lp-code-235 { display: block; left: 0px; top: 225px; z-index: 1; width: 1000px; height: 450px; width: 100vw; position: relative; margin-left: -50vw; left: 47.3%; } } </style> That’s it! Your unbounce image slider is ready to go. Please publish your page and check it in the LIVE version.
If you would like to import the code in your Unbounce account, then submit the details below and get it in your email.
If you’re making a landing page then you must need an email marketing automation tool to reach out to your leads as soon as possible.
You can find the information about those marketing automation tools here:- Latest marketing automation tools


45 Comments
That is a wonderful step by step instruction and i loved the way you have explained everything. I was looking to add image slider with text and button in my unbounce pages from couple of years but never got succeeded.
But thanks to you, i have successfully got a working slider on my unbounce page.
Looking forward to more updates.
Cheers!
I have used above same for image slider but did not get positive result.
Hi Ashutosh,
I will be happy to help you. Can you share your page URL in unbounce, so i could take a look. It has worked for plenty of users.
Please, I need help
http://unbouncepages.com/taty/
Hi,
I can’t find any page on this URL. What help do you need on that page.
I’ll be happy to help.
Thanks!!
Hi Ashutosh,
Add “mainjs” first and then add “slider” JS. Check if this solution works for you.
Yes this is working now
Uncaught TypeError: $(…).rbtSlider is not a function
at HTMLDocument. (preview?attempt=1&page_uuid=462cbdf8-59b4-4b21-927f-e2a258b3c28a&time=1554903942&token=5f72fde1ec3499747cd96d0c97b7ace62be590a2f4b6f1896d81be1c4209802e:325)
at i (jquery.min.js:2)
at Object.fireWith [as resolveWith] (jquery.min.js:2)
at Function.ready (jquery.min.js:2)
at HTMLDocument.J (jquery.min.js:2)
___________________
don’t know why, but it not works
The order of adding the JS script should be reversed. “mainjs” is the first one. Thanks for code.
Hey Dmytro,
That has worked on plenty of sites but since the unbounce has reduced dependency on JS, it may require some changes that i will look into.
By keeping the mainjs at the top, did the slider work for you? If yes, then please revert so i could tweak the post for other users.
I followed the step by step instructions but all that came up was blank space on the page? Even when I didn’t change any of the original image URLs and kept everything as you have had above, it didn’t work.
Hi Hannah,
As you can see in the demo, the slider is still working. So it should be good. I would like you to keep the “mainjs” first and add “slider” js after that so see if it works.
I will be happy to assist you with any other questions.
Thanks!!
I was able to get the demo to work after switching order and making mainjs first before slider. But, my image doesnt fill page. It stays contained within the 1000px middle screen. How do you get the entire image to fill the page in desktop mode?
Hi Thancan,
You may want to see your CSS that is containing the slider within 1000px range? You can check in “Inspect Element” of the browser.
I am wondering how to have 2 sets of sliders? I have 6 testimonials and wanted to break them into two sections of 3 sliding testimonials. The first set is working. The second set is not. I can send the URL if you have time to take a look at it. Thank you.
Hi!
How can I remove the blank space on the right side near the scroll bar?
Thanks for any help.
Preview
https://imge.to/i/bGfFG
[=
Hi!
How can I remove the blank space on the right side near the scroll bar?
Thanks for any help.
Preview
https://imge.to/i/bGfFG
[=
Hi Raphael,
If you could check the CSS, there may be some sort of padding or margin that is doing this. If you have existing CSS in your page, you may want to double check it?
Please let me know if you will need any other help.
Thanks!!
I can’t put the carousel in the possession I want it to be on # lp-pom-block-14
Could someone help me?
Hi Rafael,
You will have to update JS and CSS based on the block ID then. Existing code should work with Custom HTML element as mentioned. But trying to update the JS and CSS may break the slider.
Suggest you to stick to the structure and just move the HTML block up or below where you want it in the page.
I created this carousel as the instructions read, and it works correctly. But, I tried to add it to a Landing Page that was already designed with a lot of other elements and also other Javascript and CSS already were in the landing page. I copied over the mainJS and sliderJS (both as “head”) and then copied the CSS as is too. And it doesn’t show carousel. Any idea why this would be?
Any thoughts on this would be appreciated. Thank you.
Hi ThanCan,
If you’re using too many javascripts then that may break your slider. It is recommended to keep any other JS or CSS low where you want to use this slider.
Unbounce is also using scripts so sometimes it doesn’t always work with multiple custom scripts.
I can’t make it work ;(
I can help you with Avin. Can you please share your URL here? Are you using any other JS on the page? If you’re okay to share your login details then i can share my email with you personally to help you in setting it up.
I followed all the steps but it is showing blank space when previewing the page. https://prnt.sc/sd9mkw
Also, added the mainjs” above “slider” JS. https://prnt.sc/sd9lal
CSS was added to the stylesheet tab. https://prnt.sc/sd9lrd
On checking class “slItem” on the inspect element I can see the opacity:0 and visibility: hidden.
Any help will be appreciated.
I followed everything step by step, but it’s just showing a blank screen in both the blank screen and the published url. I entered in the “mainjs” (placement: head) first, then the “slider” (placement: head) js second. HEEELP please 🙂
Hi Monica,
I am sure there must be other scripts running on the page causing the issue.
Try putting mainjs first and then the other script below the mainjs.
I have posted the video above to solve the problem.
Thanks David. I am glad it helped.
Hi Sahibjot,
Thank you for sharing a step by step guide on how to add a slide to unbounce. Is it possible to edit the HTML so that 3 images with different text are displayed on each slider?
hi, the slider works perfectly. very clear instructions.
I have a problem when making it full width.
I copy de id of the box into the stylesheet, but when i do this the silder moves form its place to the top of my landing page.
do you know how i can fix this??
Thank you Agustin. I am glad it works for you.
To fix the slider positioning when it gets full width, you’ll probably have to play with CSS a bit to adjust it where you need it.
If that doesn’t help, please let me know here and I will help you out.
Thanks!!
Hi there,
I am having the same problem actually. I cannot make the width match the width of the page. I was wondering if a solution for this has been found?
Thanks,
Emma
Hi Emma,
I think I have explained that in the video where I change the id in the CSS to make it Full Width.
Please watch it in the page.
Thanks!!
Is there a way to adjust the code so that the button opens the video in a lightbox rather than linking to an external site?
Hi Erica,
As you must be aware that we don’t have an option in Unbounce to control the lightbox with click on a link. So I am not really sure.
This is something I will try and update this post If I am able to find the solution. If you have got an answer to this. Please share it with the community here.
Thanks!!
I am wondering how to have 2 sets of sliders? i cant manage to make the second one work
Hi Agustin,
This code is itself very complicated and I am sure you have more scripts running in your page. So I won’t suggest to add too many scripts in the page.
You may try replicating the script and replacing the IDs where ever you see it.
Also, you don’t really want to have too many full width sliders on a landing page because they don’t serve the purpose that you need for better conversion. They’re just going to increase the load time of your page.
Hi Sahibjot Singh,
the script doesn’t work for me as well. Maybe you can take a look?
I run a few tests and can’t find the issue.
https://mieten.lendis.io/bueromoebel-mieten/av.html
Best,
Katharina
Hi Kathrarina,
I can’t see the slider on your page. Can you please tell me where it is?
Best,
Sahibjot
Hi, first I would like to congratulate the site, very good tips. I would like to know how do I delete the line that is between a text and another of the slide.
Hi Danilo
Thanks for checking the website.
I will be happy to help. If you could kindly share a screenshot at support@unbouncetips.com then I will be able to look into it and help you to fix it.
Thanks!!
Hi Sahibjot,
I`ve done each of the steps and it works perfectly! Thank you for your helpful video! 🙂 The only thing I cant make – to change the photo on the background. In your code, I see a link that starts from Unbounce.. but I can`t understand how to find the way.
I`ll be so appreciative of your answer to me.
Hi Tetyana
You’ll probably have to choose a CDN to upload your images and get the link from there. If you would like to use Unbounce then I have shared the information on how I got the image link in Unbounce. Please open the image slider video in Unbounce and you should find the answer.
I hope that helps.
Thanks!!
Hi! Thank you for this code. The mobile view however does not show the arrows to scroll through. Do you know how to resolve this?
Thank you!
Hi Adam,
The arrows are hidden because there isn’t enough horizontal space in mobile. So the dots at the bottom of the slider are used to navigate to the next slides in mobile. I hope that helps.
Thanks!!